Saturday 26 July 2008

Roast Chicken

Roast Chicken

As I have mentioned several times in this blog, my main purpose here is to have an online repository of my recipes. I am doing just that except that sometimes some dishes are so simple and so common in our dining table that I've forgotten that I haven't blogged it yet. One of these is this simple roast chicken that my kids often request on weekends.

Inasmuch as I'd like to have a perfect smooth-skinned roasted chicken, my picture belies the fact that I use a rack. Having a rack tends to dry out the bottom of the pan a little. I like to have some crusted bits in there to give lots of flavour to the gravy.

There are so many ways of roasting chicken. Some recipes have the chicken positioned upright, some puts the chicken on one side then move to the other side after a period of time, for some you have to put in butter underneath the skin, some asks you to put in everything with it, and so on. What I'm recording here is the very simplest way that I know to roast a chicken while still retaining that all-important juiciness in the meat - specifically in the breast (picho) area.

To do this, you can see in my procedures that for the first half of the baking/roasting the chicken is placed breast-side down. This makes the juices to run down to the breast area and keep it moist. The downside is it will result in a little bit flattened breast in the final product. Silicone anyone? ;) But I'm sure you'd trade flat chests ... er... breasts with extra juiciness, wouldn't you?

Okay so much for breasts. Lemon is optional because recently I've been noticing that sometimes it lends some bitterness in the underside of the chicken. This comes from the lemon skin and I really have no clue how to resolve it. Though it does give a boost of a little sourness in the gravy which greatly enhances it. If I don't use lemon in the inside I just squeeze about a tablespoon of lemon juice in the gravy.

If price is no object, I would definitely suggest you use organic free-range chicken. In my experience, they consistently give the best flavour not only in the meat but results in much better gravy as well. I have heard from Stel and read from my current cookbook bible (The New Best Recipe) that brining the chicken before roasting improves the flavour by a mile. I shall try that next time and report the results here.


Roast Chicken

1 whole chicken (about 1.8 kg)
3 tbsp butter - either in room temperature or melted
salt and pepper
herbs and spices (optional)
lemon (optional)
  1. Preheat the oven to 190°C/fan 170°C/375°F.
  2. If you buy the chicken from supermarkets they are usually bound by a string around the wings, legs and feet. Remove all the strings from the chicken but keep the wings tucked under the chicken.
  3. Tie the chicken around the feet only.
  4. (Optional) You may use half or a whole lemon. Pierce it all over by a fork then put it in the breast cavity via the hole at its end.
  5. If using melted butter, spread it all over the chicken with a pastry brush.
  6. If using room temperature softened butter, use your fingers to slather the butter all over the chicken.
  7. Sprinkle salt and pepper all over.
  8. (Optional) Sprinkle all over whatever herbs or spices you want to put on it. If need be, omit the salt and pepper.
  9. To calculate how long to bake, give 25 minutes for every 500 g  of chicken. So our 1.8 kg bird is to roast in the oven for a total of 90 minutes.
  10. Place the chicken breast-side down in a metal roasting pan (you may use a rack if desired). Bake in the preheated oven for half its baking time (in this case 45 minutes).
  11. Remove from oven and turn it so that it is now breast-side up. At this point I usually sit it on a rack but it's up to you if you want to or not.
  12. Immediately return back to the oven and bake for the remainder of its baking time.
  13. When done, remove from oven and place on a serving dish. Cover loosely with foil and let rest for about 10-15 minutes while you're making gravy.
  14. Serve sliced with roast potatoes, gravy and veggies.


Chicken Gravy

2 Tbsp chicken fat or butter or vegetable oil
2 heaping Tbsp flour
2-3 cups chicken stock (approximate)
salt and freshly milled black pepper
2-3 tsp lemon juice (optional)

  1. Remove the chicken fat or drippings from the roasting pan but retain about 2 Tbsp.
  2. Put the roasting tin on the cooker hob and heat up the fat.
  3. Once moderately hot, sprinkle the flour on it. Cook the flour (preferably with a wire whisk) with the fat for a few minutes.
  4. Add the stock gradually in 1/2 - 1 cup batches. For each addition, bring the mixture back to boil while continually stirring making sure to scrape the bottom for all the roasting bits left in the pan.
  5. Once all the stock is added, bring back to boil and then lower heat to simmer for about 2-3 minutes.
  6. If the stock is too thick add more water or chicken stock. If too thin then simmer it longer until the desired thickness is achieved.
  7. [Optional] Add a squeeze of lemon juice.
  8. Taste the gravy and add salt and/or pepper if necessary. Strain liquid into a serving jug. Serve hot.


Roast Chicken

Wednesday 23 July 2008

Classic Pound Cake

The last time I remembered I ate a pound cake it was of the Sara Lee variety. You know those frozen ready-made ones you get from the supermarkets. Don't get me wrong I love them and they are of the perfect texture, taste, and richness. But I have this long-running challenge to myself of seeking out the best recipes for everything and this recipe for pound cake I found in The New Best Recipe cookbook (which I will blog separately later) certainly looked intriguing.

Pound cake would be called butter cake around here and I guess is a cousin of the Madeira cake. All are butter-based cakes with only subtle hint of vanilla, almond or lemon in them. I was intrigued enough with this recipe because it did not have any leavening (i.e. baking powder, baking soda, etc.) and relies primarily on the lifting power of six eggs. Not only that, the eggs are not added whole one by one into the batter, as you would usually do, but first lightly beaten then added as a thin stream while beating.

Thankfully, I did succumb to finally making it last weekend otherwise I would not have known the best butter-based cake I have ever baked. I kid you not, I wholly recommend this recipe just look at that high peaking cake below. Probably the only thing I would change is the type of sugar. Next time I would use caster sugar instead of the coarser grained regular granulated. It blended in fine but you can clearly see at the top crust the small round granules of the sugar. I'd like it to have a smooth golden surface next time and then it would be perfect. Move over Sara Lee!


Classic Pound Cake

250 g  [1 cup] unsalted butter - soft at room temperature
260 g  caster sugar (superfine)
3 large eggs - room temperature
3 large egg yolks - room temperature
1/2 Tbsp vanilla extract
1/2 Tbsp water
1/2 tsp salt
170 g  [1 1/2 cups] cake flour or plain flour
  1. Preheat oven to 325°F/160°C/fan 140°C. Grease a 9x5-inch loaf pan and line with parchment paper.
  2. Lightly beat the egg and egg yolks in a small bowl with a fork.
  3. Mix in the vanilla and water. Set aside.
  4. Using an electric mixer, beat the butter in a large bowl until smooth and shiny.
  5. Add the sugar in slowly while continually beating.
  6. Beat the butter-sugar mixture until light and fluffy, about 5 minutes.
  7. While the mixer is still running, slowly add the egg mixture in a thin stream.
  8. Finally beat in the salt.
  9. Sift 1/2 cup of the flour on the batter and fold gently with a rubber spatula until well incorporated.
  10. Repeat this procedure in 1/2 cup increments until the flour is used up.
  11. Pour the batter into the prepared pan and smooth the top.
  12. Bake for 70-80 minutes or until a skewer pierced into the middle top comes out clean.
  13. Remove from oven and let rest in the pan for 5 minutes.
  14. Turn out and let cool completely. Serve.


Monday 21 July 2008

Hawaiian Delight

gifts from Hawaii

I know, Ernie, this post is way too tardy! We received these very yummy gifts from our dear architect-family friend Ernie all the way from sunny tropical Hawaii. You don't know how uplifting it was to receive such brightly packaged things in the height of winter. By the time we received his email a day or two later the macadamias were demolished! The lightly salted smoked nuts were the first one to go. I tell you once you've eaten one you can't help reaching out for more.

I love love love the wonderful aroma and flavour of the teas which thankfully we're still enjoying now (it's because the kids don't drink tea that's why). I can't decide which one I liked better but they're definite favourites of me and my husband when we sit in front of the telly at night once the kids are in bed.

Thanks very very much Ernie! We owe you lots. :)
Wish we could be there ...


Sunday 20 July 2008

Life Lock

The advent of easy access to data and information helped by great advances in computers and in the internet spawned a great deal of new generation of thieves that deals with stealing identity data from you. This would include, but not limited to, getting hold of your personal details such as name, birthdate, addresses, phone numbers, family details, work details, etc. But more worryingly they are able to acquire financial details such as bank accounts, credit cards, credit reports, etc. The result of which usually ends up with the victim being conned and scammed of hard earned money, his/her back account emptied, or credit cards used to the limit and left the bill to be taken cared of by the victim.

There are a number of companies that you can employ to help you be protected. One of them is Life Lock - a company that has a comprehensive scheme of reporting and safeguards that can help you with a comfortable level of protection. It a well established company in the US that has assisted a lot of people in controlling and preventing identity theft.

Life Lock currently have an ongoing discount promotion. You can avail of this by simply clicking on lifelock promo code at lifelock.com and enter the word 'RD17'.

Saturday 19 July 2008

BBC GoodFood

BBC GoodFood magazine 

One of my favourite food magazines of all time is the BBC GoodFood magazine. I've got so many of it that I reluctantly had to rip out the recipes I want and throw away the magazine to give me more space for the next issues. I keep forgetting to blog here that they already have a website where you can see recipes not only from them but also from sister magazines like Olive. I have to emphasize that this is quite different from the BBC food website which has also been a source of recipes and good advice for years.

The GoodFood magazine's big colourful pictures is especially appealing to me including the big fonts and clear instructions in recipes. They've got blogs, forums, even competitions on the site. Mind you they did not pay me to write this but I always post tips on things I found in the hope that it might help others.


Friday 18 July 2008

Small Baths

** Sponsored Post **

Ever since we moved to our current house two years ago we have been wanting to renovate our bathroom and toilet. It's not in a very good state right now although it is still usable. There are always DIY magazines strewn about in the house for us to plan or dream on what we can do. We also visit bathroom stores from time to time and drool at the gleaming spanking new fixtures. It progressed on to even drawing out plans and a rough bill of materials for our dream bathroom.

As we found out one of the constraint in this country is the size of the houses and consequently the bathrooms. Space is cramped so wanting to have a big bathtub or a jacuzzi is a constant challenge. Fortunately, British traders supply demand for small baths and small everything for the bathrooms. So you can find lots of designs and types of small baths in all DIY and home improvement shops and on the internet market.

The one beauty of having small baths is you don't use up as much water as a big sized one. This is a boon for water-conservation minded people or people like me who hates any kind of waste. A lot of people I know, and probably most people in the UK like me, have a bath only a few times a year. Wait a minute, don't think that we stink for the rest of the time. A shower is what we usually have. My point is why have a huge bathtub if you're only going to use it a few times a year? A small bath would be good enough to have.

Corned Beef Hash

It's time to update this old post that I had to put offline since it was getting a lot of hits based on a very negative and insulting post of another food blogger. He was mocking my picture saying that it looks like a dog's dinner although he didn't have the courage to post his name online (or even just his persona) in the comments section. His blog was based around all the disgusting food pictures he can find and went on great lengths to mock them. I say them lot never last.

While admittedly my picture is not a paragon of beauty (I will upload a better picture later). I think the insults and online mocking is uncalled for. If you can't say anything nice don't say anything at all. Besides, there are food that taste better than they look - like ma po tofu for example.

Well, nowadays his blog is nowhere to be found. And so is the old Frugal Fridays food blog to which I initially intended this recipe. But nevermind blogs of short endurance, I resolved to post this again for my recipe collection.

This is one of cheaper dishes you can make. As you can imagine this graces our dinner table here and when we were growing up in the Philippines whenever we want something cheap and cheerful and relatively easy to make.

Actually this is quite adaptable in terms of stretching to feed people. The principle is the more people you have to feed the more potatoes or water (or both) you have in add in. And I've seen near soup-like consistency of this that feeds a large family with a big help from heaps of rice of course. It's quite versatile in that you can have it with rice as mentioned and with almost all types of breads.

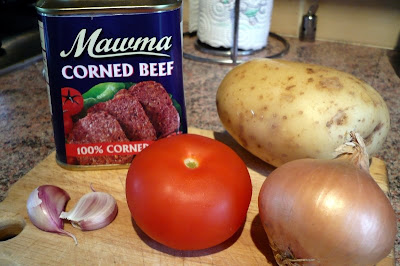
Corned Beef Hash ingredients
As you can see from the ingredients I used this would hardly come up to £3.00. One thing about the canned corned beef, the brands they sell in the local supermarkets like Tesco, Sainsburys, Morrisons, etc., are quite bland. They don't even taste beefy. Previously I have to look for Libby's brand in either Filipino, Chinese, or Caribbean shops. It's worth mentioning as well that the Purefoods brand from the Philippines is simply delish. Anyways, it's a good thing we found that the cut-price supermarkets of Aldi and Lidl sell brands like Mawma and Premium which taste closer to Libby's and the ones we got used to in the Phils. Besides the fact that they are much much cheaper than supermarkets.

Cooking this is a doddle. Probably the only effort you need is in slicing the garlic, onion and tomatoes. The latter is optional because I learned from experience that if you put tomatoes it spoils faster than without. If you're eating it all right away or if you refrigerate leftovers then it's not really a problem. If your corned beef brand is good then its saltiness is enough so you do not have to add salt.

As I said before the amount of potatoes and water is up to you. Me, I like it dry and even crusty at the bottom. Do have it with rice but it's especially yummy with pandesal.


Corned Beef Hash


Corned Beef Hash
(Ginisang Carne Norte)

1 can corned beef
1 medium onion - roughly chopped
1-2 cloves garlic - minced
1 medium tomato - chopped (optional)
1 medium potato - peeled and diced
1/4 cup water
1 Tbsp cooking oil
  1. In a pan or saucepan, heat the cooking oil.
  2. Saute the garlic and onion in medium heat until it is translucent.
  3. Stir in the tomato and cook until soft.
  4. Open can and put the contents in the pan. Mash the corned beef and mix well.
  5. Add water and bring to boil.
  6. Add the potatoes and stir to mix. Cover pan, lower heat and simmer until potatoes are cooked.
  7. If you want it a bit drier, remove cover turn up heat to medium and cook for a few minutes more. Dish up and serve.


Corned Beef Hash

Wednesday 16 July 2008

Winds of Change

It's nearly the fourth anniversary of this blog of mine. For most of the time, my blogging have been centred on anything food related. I thought of adding in different types of posts to fit in with the changing times - which really means the changing depth of my pocket. :) Okay okay let's call a spade a spade. In other words I will be posting paid advertisements here. I will not try to cover up my paid posts and try to pass them as personally my own. They will be here because I chose to and I hope you will still continue to visit this blog because I will definitely still be blogging on food and cooking and baking and lots of other things. If you're interested in the ad posts, do click on the accompanying links. If not, just click on by and ignore them. You'll still find nuggets of food stories and recipes around here.

Cheerio mi amigas! ;)

Tuesday 8 July 2008

Sweetcorn Soup

Sweetcorn Soup
I'm not too fond of soups because it fills me up quickly which means less room for the main course and that would be a tragedy.

Occassionally when the weather is chilly you need all the help you can get to warm up. One of my favourites is this Chinese restaurant standard - sweet corn soup. It can have a variety of meat in it but the popular ones are either chicken or crab.

Before trying to cook this I didn't know that it is this easy to make. It is basically creamed corn (usually canned variety) cooked in stock then a diluted beaten egg or eggwhite is stirred in. And that is it! Of course you can prettify it with some chopped green herbs sprinkled on top but other than that it is really a doddle to make. This recipe is a hybrid from the ones in The Food of China and Deh Ta Hsiung's Taste of China.


Creamed Corn


Sweetcorn Soup

250 g  minced pork or chicken or shredded crabmeat
5 cups chicken stock
3 Tbsp rice wine or cooking wine
400 g  can of creamed corn
1 tsp sea salt
2 Tbsp cornstarch
2 egg whites or 1 large egg
1/2 tsp sesame oil
salt and pepper to
chopped green onions
  1. Mix the meat with 1 Tbsp of rice wine. Set aside.
  2. Mix together the cornstarch and 1/4 cup water. Set aside.
  3. Whisk the egg whites or whole egg until frothy. Stir in the cornstarch mixture until smooth.
  4. Combine the stock with the creamed corn and remaining rice wine in a saucepan and bring to boil.
  5. Add the meat and marinade. Stir to separate the meat.
  6. Lower heat and simmer for about 5-10 minutes.
  7. Bring the heat to medium and then slowly stir in the egg mixture in a thin stream to the soup until well blended.
  8. Stir in sesame oil.
  9. Taste and adjust seasoning with extra salt and pepper if needed.
  10. Serve garnished with chopped green onions on top.

*Note: The meat is entirely optional.