 It's the first time I've baked pizza completely from scratch - well actually I didn't make the mozarella and pepperoni - but other than those I made ones from raw flour, yeast, etc. to make the dough. I especially like the dough kneading and rising. One tick in my list of things I wanted to do all my baking life plus one less block off my phobia of yeast.
I love the texture and billowy softness of the dough after the overnight rising. It was like a baby's bottom. Though it's also this quality that makes it a bit tricky to stretch and toss since the softness makes it so easy to expand it too thin. My dough actually suffered holes in the first two times which reminded me not to do too much stretching. Only one toss is for me is enough. More than one toss and you're really stretching it too far.
The Daring Bakers are the 'culprits' in this latest experimentation. This month's theme is currently hosted by Rosa and is also done in memory of Sherry who was supposed to be the co-host until her untimely death last July of a massive heart attack. Here's to you Sherry wherever you are.
It's funny, we were asked by Rosa to take pictures of ourselves tossing the pizza but my kids were more afraid of me dropping the dough on them or worse on the floor. Nothing of the sort happened of course but no picture materialized.
I know what you're gonna say - why make a boring pepperoni pizza? Well it's the topping that my family likes so I don't really care what anyone says. Also, for me to experiment I have to start from the most basic before moving on to more adventurous pastures. Avoiding waste was also in mind since I was wary that it would all go wrong so I don't really want to buy exotic pizza toppings for now.
I don't have a pizza stone so I thought the next best thing would be to use the smooth underside of my cast iron grill. It worked particularly well if I must say so, turning out crisp evenly baked crust.
My problem was in the transferring of the assembled pizza to the hot cast iron pan in the oven. I didn't have any semolina or cornmeal to slide it in easily. So I used a lot of flour on the chopping board though it doesn't work all the time which sometimes make the pizzas into odd shapes. Well, rounded or not the pizzas were gobbled up as soon as they come out of the oven. So the irregular shape really does not matter as much as the all important taste.
I'd just like to say thank you for the great dough recipe which is adapted from The Bread Baker's Apprentice by Peter Reinhart. It's something that me and my family would definitely have again and again.
Basic Pizza Dough
4 1/2 cups white bread flour, chilled
1 3/4 tsp fine salt
1 tsp instant yeast
1/4 Cup olive oil or vegetable oil
1 3/4 Cups water, ice cold (4.5°C/40°F)
1 Tbsp sugar
Semolina/durum flour or cornmeal for dusting
*Day One
- Mix together the flour, salt and instant yeast in a big bowl.
- Add the olive oil, sugar and cold water and mix well with a wooden spoon to form a sticky ball of dough.
- On a clean surface, knead for about 5-7 minutes, until the dough is smooth and the ingredients are well distributed. If it is too wet, add a little flour (not too much, though) and if it is too dry add 1 or 2 teaspoons extra water.
NOTE: If you are using an electric mixer, switch to the dough hook and mix on medium speed for the same amount of time.The dough should clear the sides of the bowl but stick to the bottom of the bowl. If the dough is too wet, sprinkle in a little more flour, so that it clears the sides. If, on the contrary, it clears the bottom of the bowl, dribble in a teaspoon or two of cold water. The finished dough should be springy, elastic, and sticky, not just tacky, and register 10°-13°C/50°-55°F.
- Flour a work surface or counter. Line a baking sheet with baking paper/parchment. Lightly oil the paper.
- With a metal or plastic dough scraper, cut the dough into 6 equal pieces. You may weigh them to divide them equally. Each piece should be about 180 gm in weight.
NOTE: To avoid the dough from sticking to the scraper, dip the scraper into water between cuts.
- Sprinkle some flour over the dough. Make sure your hands are dry and then flour them. Gently round each piece into a ball.
NOTE: If the dough sticks to your hands, then dip your hands into the flour again.
- Transfer the dough balls to the lined baking sheet and mist or brush them generously with spray oil. Slip the pan into plastic bag or enclose in plastic food wrap.
- Put the pan in the frige and let the dough rest overnight or for up to three days.
NOTE: You can store the dough balls in a zippered freezer bag if you want to save some of the dough for any future baking. In that case, pour some oil(a few tablespooons only) in a medium bowl and dip each dough ball into the oil, so that it is completely covered in oil. Then put each ball into a separate bag. Store the bags in the freezer for no longer than 3 months. The day before you plan to make pizza, remember to transfer the dough balls from the freezer to the refrigerator.
*Day Two
- Exactly 2 hours before you make the pizza, remove the desired number of dough balls from the refrigerator. Dust the counter with flour and spray lightly with oil. Place the dough balls on a floured surface and sprinkle them with flour. Dust your hands with flour and delicately press the dough into disks about 1/2 inch/1.3 cm thick and 5 inches/12.7 cm in diameter. Sprinkle with flour and mist with oil. Loosely cover the dough rounds with plastic wrap and then allow to rest for 2 hours.
- At least 45 minutes before making the pizza, place a baking stone or a cast iron pan upside down (you will use the underside of the pan for baking) on the upper third of the oven. Preheat the oven as hot as possible (around 260°C/fan 240°C/500°F).
- Generously sprinkle the back of a jelly pan or chopping board with semolina/durum flour or cornmeal. Flour your hands (palms, backs and knuckles). Take 1 piece of dough by lifting it with a pastry scraper. Lay the dough across your fists in a very delicate way and carefully stretch it by bouncing it in a circular motion on your hands, and by giving it a little stretch with each bounce. Once the dough has expanded outward, move to a full toss.
NOTE: Make only one pizza at a time. During the tossing process, if the dough tends to stick to your hands, lay it down on the floured counter and reflour your hands, then continue the tossing and shaping. In case you would be having trouble tossing the dough or if the dough never wants to expand and always springs back, let it rest for approximately 5-20 minutes in order for the gluten to relax fully, then try again. You can also resort to using a rolling pin, although it isn’t as effective as the toss method.
- When the dough has the shape you want (about 9-12 inches/23-30 cm in diameter - for a 180 g/6 oz piece of dough), place it on the back of the jelly pan, making sure there is enough semolina/durum flour or cornmeal to allow it to slide and not stick to the pan.
- Lightly top it with sweet or savory toppings of your choice.
NOTE: Remember that the best pizzas are topped not too generously. No more than 3 or 4 toppings (including sauce and cheese) are sufficient.
- Slide the garnished pizza onto the stone in the oven or bake directly on the jelly pan. Close the door and bake for abour 4-6 minutes.
NOTE: After 2 minutes baking, take a peek. For an even baking, rotate 180°. If the top gets done before the bottom, you will need to move the stone or jelly pane to a lower shelf before the next round. On the contrary, if the bottom crisps before the cheese caramelizes, then you will need to raise the stone or jelly.
- Take the pizza out of the oven and transfer it to a cutting board or your plate. Rest it for 3-5 minutes before slicing or serving to allow the cheese to set a little.
 SHF was the very first blogging event that I joined way back in autumn of 2004. Those were the days when blogging was so new and exhilarating. You know almost all of the food bloggers by heart because there were only a few of us around that time. Now bloggers are in the thousands and that's just in the food category. How time flies.
After a long while of not being able to participate in SHF, I made it a point to make sure I do it this time besides the fact that my blog needs the regular update once and again. The current theme of SHF is spice, hosted by Anita of Dessert First.
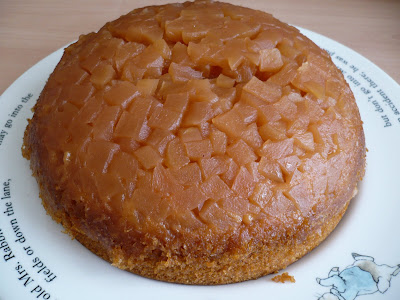
There were two choices for me to bake, either a spiced creme caramel or this mango upside-down cake. Well the sight of some Indian mangos in the supermarket did it for me. And so it was, only if I waited a little longer for it to ripen the cake would have been perfect. But that is the point of trying, isn't it? Give it a go, if it's not to your liking then do adjustments the next time.
As for cardamom, I fell in love with this spice when I started sampling Indian sweets. I love its heady aroma and the way it melds well with ingredients like chocolate. I will surely be making use more of this fragrant spice.
Paul Rankin's recipe is the one I adapted from the BBC GoodFood magazine of November last year.

160 g butter - softened
100 g caster sugar
2 large eggs
175 g self-raising flour
2-3 Tbsp milk
1 Tbsp lime or lemon juice
lime or lemon zest (optional)
2 Tbsp soft brown sugar
2 cardamom pods, seeds only, crushed
1 slightly ripe mango - peeled and sliced
- Preheat oven to 190°C/fan 170°C/375°F/gas mark 5.
- Beat 100 g of the butter with the caster sugar in a bowl until light and fluffy.
- Add the eggs one at a time, beating well after each addition.
- With a wooden spoon, fold in the flour.
- Add the milk and mix to a soft dropping consistency. If it is too thick, add more milk.
- In a 20 cm oven-safe frying pan, melt the rest of the butter (60 gm) with the brown sugar, cardamom, lemon zest and lemon juice. Stir to mix.
- Add the mango slices and cook for about 5 minutes or until it is a bit soft but still firm. If you're using a separate baking pan instead of the frying pan, pour the mango slices into the baking pan.
- Arrange the cooked mango slices well at the bottom then spoon the cake batter on top.
- Bake for 20 minutes or until risen and beginning to shrink away from the sides.
- Remove from oven. Slide a knife around the edges of the pan then turn the cake out onto a serving plate. Serve warm with some Greek yoghurt or cream.
This is one long post on a wonderful food-filled day two Sundays ago at the Ludlow Food Festival. I've always liked that market town where amidst the fascinating old timbered buildings and its castle it regularly has a farmer's market every Monday, Wednesday, Friday, and Saturday in the square opposite the entrance to the castle. This time in addition to the market lots of stalls and demonstration tents were assembled inside the castle grounds by the organisers to highlight and celebrate all the wonderful produce around the Marches (the England-Wales border area).
[Click on the pictures for a bigger view]
Just look at the beautiful timber-framed old buildings in Ludlow's streets. This is the old Feathers Hotel which used to be the residence of Rees Jones a lawyer for the Council of the Marches area sometime in the early 1600s.
Old buildings in Ludlow are not only preserved but used quite well. These parade of shops are very interesting to behold indeed with the ancient buildings they are housed.
The main festival was within the castle grounds but the festivities and exhibitions were not confined there. Numerous other shops, pubs, and restaurants in Ludlow laid out tables outside to sell their wares and of course the regular market was in full swing as well.
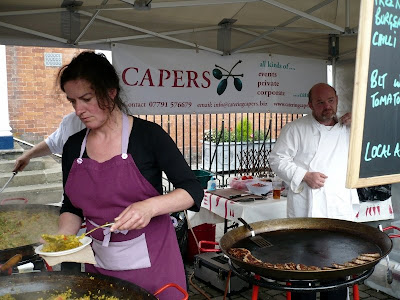
Before we went inside we had lunch among the food stalls that came out especially for this 3-day event. I got my lovely paella from this stall. £3.00 for a small plate that had 2 slices of chorizo in it, chicken, some veg and lots of flavourful Spanish rice. Yum!
My daughters had their usual jacket potato with cheese (no baked beans this time). They raved on the deliciousness of the potato and cheese from this stall so much so that my youngest insisted on getting another one on our way home. So we'll keep them in mind if we come across them next time.
Lechon! Look at that steaming hot roast pork being pulled into shreds. Over here roast pork is eaten one way by putting the shredded meat in a bun with gravy. It's nice but I prefer mine in chunks with liver sauce. Better yet any leftovers stewed in liver sauce as Lechon Paksiw. Okay we're digressing a bit ... let's get back to Ludlow. See all those shops and food above - that's just outside of the festival grounds. And now we come to view the festival itself.
As I said before, the festival was in the grounds of Ludlow castle now a ruin. The castle had a very rich history which was very much entwined with the history of English throne. It was here that Prince Arthur (Henry VIII's elder brother) died while on honeymoon with his bride Catherine of Aragon who after his death became Henry VIII's first of six wives.
Entrance fees are a reasonable £6.00 for adults and £2.00 for kids. Then they give you this red wrist band to separate you from the racing pigeons. ;)
Here was a map of the place in case you need to find yourself.
There were loads of stalls of small scale producers. Come to think of it I didn't see any big-named companies there except probably for Tyrell's who was the main sponsor. But then they're not really that big - yet.
Oh yes there's one for Veuve Clicquot champagne where you can dine with some hot seafood dishes with your champagne.
I've always wondered how apples juices are extracted and this traditional press was on hand to show us how.
He must be feeling really hot in front of that pizza oven. We saw him sitting there all day.
I nabbed 3 bags of different flours plus a nice hessian bag from this stand. Bacheldre Watermill produces stoneground flours of very good quality. Later I will definitely blog about the results of my baking using their flours.
We love this bottled spring water. For me it tastes like very clean rain water. Really soothing to drink especially when chilled. We definitely recommend Wenlock spring water if you ever have a chance to come across it.
They have several huge tents where most of the smaller producers exhibited or sold their products. There were a large variety of exhibitors which range from farms showing their meat products (see previous picture collage) to ice cream makers, vegetable retailers, etc. The following were also in the tent:
Quite a number there were small breweries making distinctive ales and spirits. As expected these were very popular with the male guests.
Chocolate makers, other sweet producers and bakers were also on hand. Though there were not too many of them.
Lots of dairy producers were in attendance. We like the organic yoghurt of The Dairy House. They were very creamy and had lots of different interesting flavours.
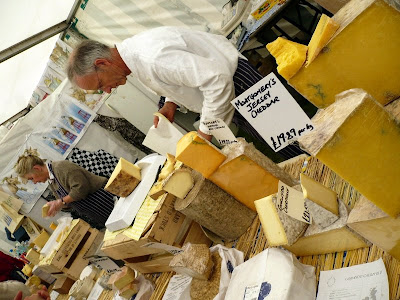
Cheese galore!
Some non-edible things were also there in the form of cookbooks (still food-related).
These are well crafted hand-made ceramic products in fun and colourful designs.
Fancy smoking your salmon while driving? It can be done!
The army came in culinary force as well, treating people to some inexpensive but tasty soup and bread.
The music on offer were top-notch as well. Good enough to make a whole gaggle of people crowding in front of them while scoffing their tasty nibbles and drinks.
This trio on the other hand entertained people who patronized the cafe in the dry moat of the castle. They were very good, too.
They even have the resident fairy to sprinkle twinkly dust on everyone. ;) Well actually these are visitors as well, why they dressed like that I've got no clue. Must be a hen party? But he's a bloke ...
The little ones were not neglected. A circus tent was provided where they can try out different circus skills under the guidance of some circus masters.
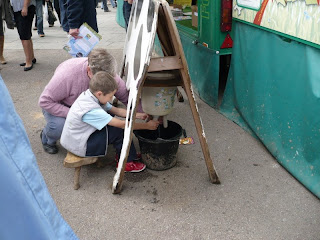
They even make the kids do some artificial milking. :) How cute.
I've been very complimentary of this festival and its exhibitors. I just want to make it clear that I am in no way affiliated with any of them nor was I paid to do any kind of advertisement. I am just happy, despite previously moaning about the dearth of foodie places in the West Midlands, to discover all these artisanal producers almost at my doorstep. It's so heartening to know that they're out there in the countryside. I just have to drive about 25 miles west and I'm in foodie country!
 It's the first time I've baked pizza completely from scratch - well actually I didn't make the mozarella and pepperoni - but other than those I made ones from raw flour, yeast, etc. to make the dough. I especially like the dough kneading and rising. One tick in my list of things I wanted to do all my baking life plus one less block off my phobia of yeast.


